Search This Blog

Sunday, January 09, 2011

The soundboard

Here is the soundboard with the rosette cut out. I followed the method in my lute book and I am reasonably satisfied with the outcome, although I think I might be needing some glasses soon!

I have made some tone bars from some nice quarter sawn Alaskan spruce (it's light as a feather) and glued the first three in place. I have put a very slight curve in the soundboard to help resist the downward pressure of the strings (although I think that this will be only modest with gut strings).

Finally, I have also started on the fretboard, by locating a lenght of rosewood in my 'woodpile'.

Monday, January 03, 2011

Rosette


Here is the design (I used a program called Kali to help make this).
I printed this out and stuck it on the reverse of the soundboard.I had thinned the wood to just over 1mm to make the cutting out easier.

Thursday, December 30, 2010

Soundboard

This is the gittern soundboard being glued up. I made the adjustable base-board to save hammering pins into any old bit of wood I find around the workshop - I'm pleased with it. I was less pleased when I carelessly snapped the newly glued soundboard when I was planing it to thickness. Luckily, it snaped right down the middle, and I was able to re-joint it. Take more care..!

I have planned the bracings and rosette and made a start on them - more in the next post.

Sunday, December 05, 2010

Neck Joint

I cut the neck joint today. I'm working out the details as I go, and I decided to move the nut position to make it easier to play notes at the first fret. Once I have drilled the holes for the pegs (eight of them) I will glue the pegbox on with araldite.

I've also been thinking a bit more about upcoming projects...here is the current list:

Finish the Gittern
Finish the Cittern
Bowlback Mandolin
Parlour Guitar (for daughter)
Tenor banjo with wooden soundboard
Cherry Mandolin
Electric Micro mandolin

...but I sure that this will change !

Sunday, November 28, 2010

A bear head

More progress on a few different fronts. First, my soundboards arrived from Alaska. I like the quality, but the import duty is really steep. I will be using a Sitka spruce one on the gittern. I have some others for my bowlback project, and a cherry wood mandolin I've had some vague thoughts about.

Secondly, I have made some progress on the pegbox - I'm quite pleased with the bear, even if he does seem a bit stern.
And lastly, I have been bidding for (and have just won) a baby milk warmer on e-bay. "Why?"you ask. Well, I will be gluing the gittern together with hide glue, and I will use the warmer to keep the glue at the right temperature. It's a bit cheaper than buying a more traditional glue pot.

Saturday, October 30, 2010

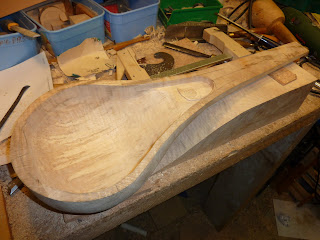
Even more like a spoon

I have now hollowed out the bowl of the gittern and added a little relief carved snail to mark it as my own. No date though otherwise my sister might get caught in an anachronism.

The bolwback arrived safely. I am going to make some technical drawings and then take it to bits so I can figure out how it was put together. I'll then make one of my own (and might be able to restore the old one too, who knows).

Sunday, October 17, 2010

A big spoon

I have worked on the gittern body shape, and it now looks like an oversized wooden spoon! There's still a bit more to come off the neck area, and the bowl is yet to be hollowed out. Still, it's progress.

Meanwhile, I have finally got around to buying (on ebay) an old bowlback mandolin. I will use this to start preparing plans to construct one of my own in the future.

Tuesday, October 12, 2010

A new start

I have just made a start on the gittern for my sister. I sawed up the great lump of sycamore that will become the bowl and neck and started the shaping. Learning my lesson from the Les Paul I have made use of a router as well as my trusty bandsaw. It's also birthday season and I now have a copy of Robert Lundberg's book on lute construction, which is fantastic.


Wednesday, August 11, 2010

Finished

I took the day off work today and managed to complete the Les Paul guitar (with only a few days to spare!). The truss rod cover was fairly straightforward, but I had to make some major modifications to the bridge which was too high. I am fairly pleased with the final result, and I've certainly learnt a lot - I hope the lad likes it...

Sunday, July 11, 2010

Nearly there...

I fitted most of the ironmongery today. There's just the nut (and truss rod cover) to make and fit, and some soldering to do before I get to fit the strings and see how it sounds. I just remembered that I need to order some strings

Sunday, June 27, 2010

On with its neck

The mission for this weekend was gluing on the neck (using lots of Araldite - the proper slow setting stuff). This went without a hitch, and once it was well set I sprayed some dark brown nitrocellulose to blend the colour of the joint (I thought that the colour transition was a bit too harsh before). The whole thing is now getting a few more coats of clear nitrocellulose. I also made a pickguard fron some ebony to match the fretboard - I'm quite pleased with this!


The flash makes it look a bit redder that it looks under natural light, but it shows up the quilting on the maple very nicely.


Tuesday, June 15, 2010

Nitrocellulose

I am now in the process of spraying the nitrocellulose finish to the body and neck. After sanding everything down about 6000 grit, I sealed both with a coat of shellac (Zinsser Bulls Eye). I have been spraying the back of the body with layers of a mid brown (a couple of coats each evening), and I'm now happy with the colour (the finish is from Manchester Guitar Tech). The neck has been coated with a lightly tinted gloss. I have also sprayed a couple of coats of clear gloss to the front prior to attempting the cherry sunburst. So far so good!

Also, I have started soldering the electronic bits together.

I really feel the clock ticking now as August approaches...

Sunday, May 23, 2010

Fretting

The task for this weekend was fitting and dressing the frets. With the binding on the neck, the frets needed to be undercut. I used a special tool from Steward Macdonald - it made job much easier. I'm beginning to feel the time pressure now.

Sunday, May 16, 2010

"I see you have constructed your own fretbender, young Skywalker"

I've mostly been gardening at the weekend, but I did manage to make a fretwire bending tool. It worked fairly well (that's the bent fretwire in the picture).

Sunday, May 09, 2010

Starting to look the part

I haven't updated in a while, but I've been making steady progress when time is available. The new bandsaw has been a real boon - I think that this will be a great workhorse in the garage. The neck is now mainly complete - just the frets to fit and a truss rod cover to make. The most recent change has been the addition of the side dots.

The body shaping involved a lot of planing, scraping and sanding and I think it looks quite nice. I've fitted the binding and I still HATE this plastic stuff. I know it's more authentic, and is easy to scrape flat, but the gluing is ever so fiddly and I always seem to be left with some gaps. These have been filled with epoxy, but I'm going to 'stick' with wood bindings in future!

The pictures show the neck in place, but there's no glue involved - I will apply the sunburst and finish (nitrocellulose from an aerosol can) to the neck and body seperately.


Friday, April 02, 2010

'ello John, got a new bandsaw

I'm now the proud owner of a new bandsaw - I needed something a bit more manly than my old one so I could make book matched fronts for mandolins and guitars. Here it is, about to resaw the front of the Les Paul.


I've glued the two halves together, fixed them to the back, and routed out the cavities for the pickups.


Sunday, March 21, 2010

Neck

Well, the neck is now shaping up; the bindings are on (I remembered that I hate plastic bindings), and I have shaped the neck profile. I will put in the side dots next, but I'm going to leave fitting the frets until the neck is in place (unless I work out that this is a dumb order). My lad has checked the the neck profile fits his hand comfortably.

There was a minor issue with the wood for the front, as it turned out that the piece I wanted wasn't in stock, but I am happy with the alternative, a nice bit of quilted maple.


Sunday, March 07, 2010

Fretboard

I have now finished the mother of pearl inlays on the fretboard. Here it is after all the little cavities were routed, and in the other picture everything is glued in and sanded flat. I also sanded a radius onto the fretboard.
I used a home made sanding block with the correct radius hollowed out , and with a coarse grit paper it didn't take much effort to get a nice rounded profile. I finished off by smoothing it with my micromesh pads. Finally, I prepared the tenon where the neck will join the body. The next job is to glue the fretboard into place and complete the binding.


Thursday, March 04, 2010

Top

I have ordered the wood (from exotichardwoodsukltd.org.uk) for the top of the Les Paul. It appears to have a strong quilt figure which the customer, (older son), liked the look of, but I will have to see when it arrives. The outline drawn on it is not the proper shape, only a guide!

Meanwhile, I am getting on with the inlays on the fretboard. My mini rotary tool died in the process (with a small bang), so I've replaced it with one from Axminster . So far I'm very pleased with it.

Sunday, February 07, 2010

Peghead

Here is the peghead - it's bound and inlayed with abalone and mother of pearl. I took out the scratches with micromesh - it gives a really nice finish.Add Image

Sunday, January 10, 2010

Into the new year

Although I haven't updated this diary in a while, I have been making some progress with the Les Paul. Many of the methods are new to me, which makes it more exciting! I fitted the truss rod (a hotrod), and two carbon fibre reinforcing rods to the neck and finished the rough shaping. I made a peghead veneer from an off cut from a macassar ebony fretboard, but decided re-saw and bookmatch it (quite a challenge). I'm happy with the results though, and this is now fitted and the bindings are glued in (currently held in by all those rubber bands). I have marked out the fretboard and made a start on the inlays (XXI to mark the birthday, and my snail logo to signify slow progress). These will be inlayed into the peghead next, as the design below:

Thursday, December 10, 2009

Further Indulgence

I have downloaded the Audible sound recording open source software, and I am beginning to get the hang of it. I've now mastered two track recording (well...overdubbing), so I thought I'd make a festive recording with my mandolin (it seems tiny compared with the octave) in duet with itself. All I now need to do is to master the playing a bit better. Anyway, here it is - Silent Night.

Tuesday, December 08, 2009

Indulgence

I fitted the carbon fibre reinforcing rods to the neck of the Les Paul, and made a start on the electronics. These are a bit confusing as I have got three diffrent wiring plans! Still, I've made my choice and done a bit of soldering. And now the indulgence...I thought I ought to have a soundfile of the octave mandola, so I've uploaded up a song - its written by Flogging Molly but mangled a bit here!

Sunday, November 15, 2009

Les Paul gets a neck

I thicknessed one of my pieces of sycamore today, and with the bandsaw cut out three neck profiles (and a couple of 'ears' for the peghead). I glued them together with Extramite glue and clamped them up with loads of clamps. The cloth is there to catch the glue that is squeezed out. I'm a bit concerned about potential twisting (the sections of wood are not truly flat- or quarter-sawn) so I will probably fit some carbon fibre as well as the truss rod.

Tuesday, November 10, 2009

Finished (almost)

I did quite a lot last weekend and made the truss rod cover and a bridge out of an offcut of ebony from the fretboard. I tried a new design for the bridge, and I'm pretty happy with the result.

I fitted the metalwork (tuners and tailpiece) and put the strings in place. I am delighted with the tone, it has more sustain that the smaller mandolin, but still has that mandolin 'ring'. The fretboard seems huge compared with its smaller cousin, and needs a much more active left hand.

Once it has settleed down, and the strings hold their pitch for more than half an hour I will need to refit the bridge and lower the action a little bit.

I can now concentrate on the Les Paul, but already my mind is wandering to the cittern, gittern and the next two mandolins after that...


Here is a close up of the bridge. It has a bone saddle which is at a slant to compensate for the changes in pitch as the strings are pressed down onto the frets.


This is the back - the walnut has taken the finish nicely.

Wednesday, November 04, 2009

Starting to finish

The octave has had a couple of coats of of Tru-oil now. It will take a few more coats until the grain if filled and the surface is really smooth.

Sunday, October 18, 2009

Routing out

The Les Paul body weighs a little less now as I have completed routing out the cavities for the electronics and the 'weight loss' chambers.

I have also made a little spacer piece so that my Allen tailpiece fits a bit better to the octave mandolin.

The flash has exagerated the contrast between the colours (walnut and macassar ebony) a bit. The tailpiece has a radius of about 24cm, whereas the bottom of the mandolin is nearly flat.


Sunday, September 27, 2009

Les Paul gets a body

A busy weekend with loads of sawdust. I took the great slab of ash and sliced it up then adjusted the thickness with my radial arm saw. I then glued the two halves together and after some further planing I cut out the approximate shape on my bandsaw. I used the template as a guide for the pin router and finished it off with the belt sander. Result.

I have been looking of the web at some of the 'chambering' that Gibson use to hollow out their guitars. My lump of ash still weighs a ton and would benefit from a bit of a diet.

Wednesday, September 23, 2009

More Wood

I collected some wood from Goulden Hardwoods today, for the Les Paul. Some ash for the body, and sycamore for the neck. I was also tempted by a lovely piece of walnut (back and/or sides for a mandolin) and some cherry (I don't know where this will end up). Here it is in the back of the car with the body and neck templates on the top of the pile.

Monday, September 21, 2009

Tailpiece

I've just ordered one of these...

Sunday, September 20, 2009

What's left to do

I found time today to fit the last of the frets on the octave mandola. It's now pretty much ready to apply the oil finish (just some slots to cut in the nut first). After that, all that remains is to make a bridge, and fit the hardware.

I also made a braiding wheel today - a copy of the one my sister has. Its made from a piece of santos rosewood and seems to work quite well!


Finally, I'm hoping to pick up some wood for the Les Paul on Wednesday - exciting stuff...

Sunday, August 23, 2009

Ready to nut and fret

I have glued on the fretboard and shaped the neck to fit. After a bit of filling in gaps (I decided I don't like superglue after all - back to good old araldite) the woodwork is pretty much finished. I now need to make the nut, fit the remaining frets and make a bridge. Also, I have decided, in the end, to buy a metal (cast) tailpiece as I'w worried about the force from the eight strings breaking any wooden one. On the left is the the instrument as it stands:

Sunday, August 16, 2009

Dots

The fretboard shim has been glued in and I have fitted the position dots into the fretboard. I got these from Small Wonder Music, and they were excellent value. I have also fitted the last eight frets - these will end up over the soundboard, and tapping them in might cause problems if I fit them after the fretboard is glued in place (I learnt this on the last mandolin). I glued the dots in with superglue and used 'kicker' to set it hard - is seemed to work well.


I also made a start on the Les Paul
- only making a body template, but it's a start!

Sunday, August 09, 2009

It's been ages...

...since the last post. The octave now has bindings fitted, top and bottom. I experimented by gluing the bottom set in with superglue, but although it meant I could get on the scraping and sanding straight away, I think I prefer the slower setting 'Extramite' glue. I have also made the fretboard shim so everything's ready to glue on the fretboard itself and finish the neck.

I've also been looking through the plans for the Les Paul copy that I have promised to make for my older son's 21st birthday. I had better get started soon as there's only a year to go...

Monday, July 06, 2009

I'm still in business

Just a quick post to say that the octave mandola is still moving along, I simply haven't had time to write any updates (well, I was probably too lazy). I have added some binding to the top, and cut the 'groove' for the binding on the back. I have also made the fretboard, but I won't fit this until all the binding is finished. Finally I've been to Halfords and bought some stainless steel brake cable. I'm going to use this to attach the tailpiece, 'cello-style - I have no idea if this will work!

Time is ticking on now, and I really need to get started on the guitar in August, as it will be one year from my older son's 21st birthday, and he might end up with no present...

Monday, June 08, 2009

Sticking the lid on

It's really starting to look the part. I stuck in my label, gave the inside a coat of varnish and then glued the front on with extramite adhesive. The back and front overlap the sides, so the next job will be to trim these flush, prior to fitting some binding.

Sunday, May 31, 2009

Lots of pegs

Here is the obligatory picture of a host of clothes pegs - in this case affixing the lining. After this the front goes on, so I will have to remember to stick in my maker's label. I also glued the back of the cittern today, with its stripe down the middle.

Sunday, May 17, 2009

Cittern neck

This generated a great deal of sawdust, but it's looking quite good. The peghead is longer then the octave mandola to accommodate the ten tuning machines, and the neck is wider to give room for the five sets of strings. The fretboard is going to have a slight radius (30cm) to make this wider neck more comfortable. The strips in the fromt of the picture are the pine linings ready to be bent (these should do both instruments if I don't snap them during the heat bending).

Sunday, May 10, 2009

Heel Cap

It was a bit fiddly, but I decided to fit a heel cap to the octave mandola as the walnut back wasn't quite big enough. I made this from some of the macassar ebony that I'm using for the fretboard and peghead veneer. I also fitted the truss rod to the cittern neck.