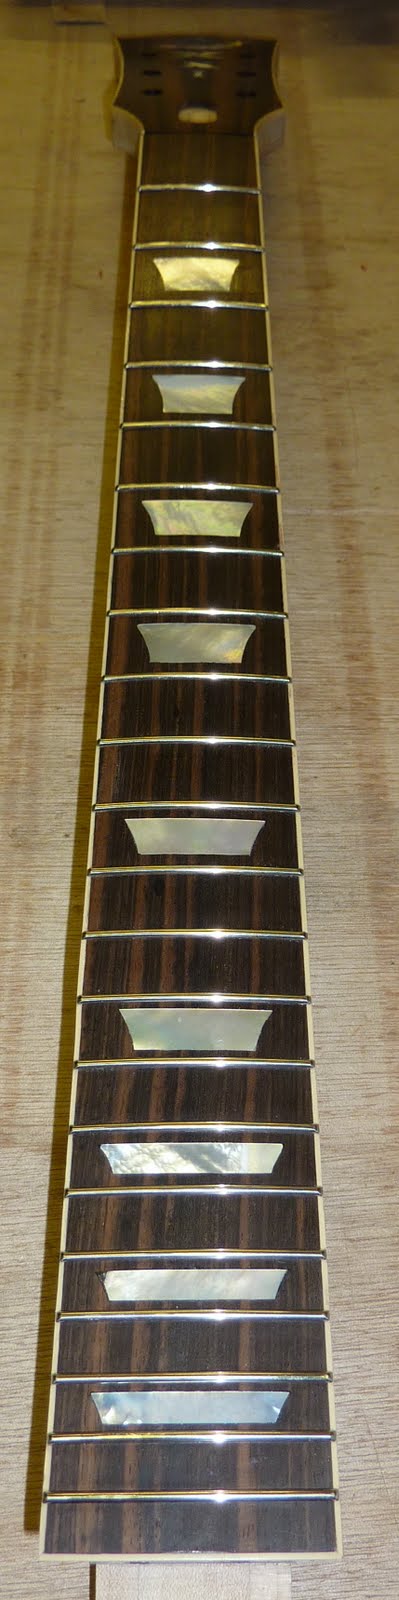
I have been wondering whether to glue it on to the bowl and then do the shaping, or shape it first - I will probably go for the first option.
Sunday, November 27, 2011
Bowlback neck
I have been wondering whether to glue it on to the bowl and then do the shaping, or shape it first - I will probably go for the first option.
Saturday, November 26, 2011
Status Update
I have also been making a bit of progress with the cittern. I fitted the bindings, and I think these look great (which is just as well as I want to sell this one when it's finished). I'm now starting on the fretboard.
Saturday, November 12, 2011
A dog's breakfast
Saturday, November 05, 2011
Bowl complete
Sunday, October 30, 2011
Bowl Progress
Luckily, I managed to get the untidy part of the joint to be at the front of the bowl where it will be covered by the end cap (which I'm going to fit next).
Sunday, October 09, 2011
The thirteenth rib
The other thing is the glue... I have taken to squeezing some Titebond onto a piece of polythene and then folding this in half. I then drag the thin stringer through the glue inside the polythene to coat both sides of it at once and then trap this glue soaked strip between the existing bowl and the new rib before hammering in the tacks.
Four more ribs to go!
Sunday, September 04, 2011
Rib seven
The mould needs some improvements for next time:
1.The end cramps slip off too easily, for example when I hammer in a tack, so I will have to devise a way to fix the head of the cramp inside the mould.
2. I think it would be better to shape the mould with flattened areas to acommodate the ribs (it is rounded in cross section at the moment).
3. my gluing up technique with Titebond is messy, so I could use a brush, or maybe try the hot melt hide glue stuff.
Meanwhile, I have put together a device to make the cutting
of binding channels a bit easier. It is inspired by the one available from Stew Mac, which I think is really expensive! Mine was made from bits and pieces I already had, and seemed to work well on the cittern. I was especially pleased with the counterweight, which is the head of an old club hammer connected by wire over a cotton reel.
Tuesday, August 16, 2011
Bowlback - rib number two
I have now started on the ribs for the bowlback.
After bending the middle one to shape (dry) on the iron, I glued down the tip and the tail, and when the glue was set I shaped it with a chisel and then a file.
The next day I prepared a 'stringer' by bending a strip of sycamore veneer, and then bent the second rib to shape. After a bit of shaping (again with a chisel and a file) of one side of the second rib, this could be fitted in a fairly snug way to the first one with hand pressure. The stringer and the second rib were then glued into place (and at the tip and tail) and held in place with some carpet tacks and a rubber lugage 'bungee' while the glue set.
There are seventeen ribs in all, and two wider pieces at the top, as well as an end 'cap' and decorative side pieces. This will therefore take ages !
A few observations - First, I am using titebond glue, but I wonder if hide glue would be better. Secondly it's going to take a lot of practice to get any good at this and; Thirdly, I notice from the photos that I am a really untidy worker!
Sunday, July 17, 2011
Stringers
First I used a hacksaw to cut a groove in the top of my bending iron (actually the extension piece). The slot was deeper at the edges than the middle to make it curved at the bottom. I then cut some 3.5mm strips from a sheet of sycamore veneer (0.6mm thick) and dragged these through the slot once the bending iron was hot. As long as I worked with short movements, holding onto the strip as close to the iron as possible, it was straightforward to shape curves with different radii. Two of these practice bits are also shown in the photo. A light coating of moisture (applied with finger and thumb) speeded up the bending a bit.
When I make the stringers 'for real' I will probably prepare a set of strips and bend them as I need them.
Sunday, July 10, 2011
Neck and ribs
Meanwhile, I have taken a piece of walnut and started to prepae the ribs for the bowlback. I cut 4.5mm slices with my bandsaw (with a fresh blade fitted) and then reduced them to a thickness of 2.7mm with my drum sander. Out of the 24 bits, a few are sapwood and very plain, but the rest have a nice dark colour and some attractive grain.
Sunday, May 22, 2011
Sunday, May 15, 2011
Bowlback mould
Sunday, May 08, 2011
Cittern and bowlback mandolin
I'm also getting cracking on the bowlback mandolin project. I have 'dismantled' the one I bought on ebay (I think the cracked neck made it beyond repair anyway), and taken lots of photos and prepared some drawings. The detailed look at the old Neopolitan instrument was very informative - it was fun to imagine the 'production line' for these inexpensive litte instruments in the south of Italy at the turn of the last century. I have now started to prepare the mould for my own bowlback based on the technique used for lute making.
Sunday, March 27, 2011
Finished!
Sunday, March 06, 2011
Tied Frets
The cittern was dusted off, and I made and fitted the braces to the back.
Sunday, February 27, 2011
Broken Strings
The gittern is now almost finished, and only the tied gut frets remain to be fitted. I strung it up at my intended pitch (d', g', d'' & g'') but this was just too much of a stretch for the top pair of strings (0.33 mm carbons) and so... 'twang' followed by a small amount of blood! I have now lowered the pitch by a third to b, e', b', e'' and await the arrival of some replacement top strings (0.37mm).
The tone is clear and bright, with good sustain, and a bit louder than I had expected. The volume increased noticably as I 'fitted' the bridge (reducing its mass by more than half). I made the bridge from Macassar ebony as I like the colour (it looks good with the rosewood, and doesn't really need any oil finish) but I wonder if sycamore, being less dense, would have made it even louder. If I'm feeling adventurous I might try and post up a short MP3 (when the new strings are here and the frets have been put in place.
Sunday, February 13, 2011
Four coats of Tru-oil
A few scratches have made it through the sanding process - I will have to take more time on this process on teh next instrument.
Sunday, February 06, 2011
Getting Close
No picture today, but the gittern is now ready for 'finishing'. I'm going to use Tru-Oil, my favorite 'drying oil'. I have still to make the bridge and to do a final fit on the nut and the pegs, but after that it's just the strings to add!
Sunday, January 30, 2011
Binding
I have also fitted the fretboard which is also Indian rosewood and tones in quite nicely. I was going to try and use authentic glues, but in the end there is a bit of everything in there: titebond, cascamite, araldite and superglue !
Sunday, January 16, 2011
On with the soundboard
Anyway, when I was happy with the tap-tone, I glued the soundboard onto the body.
I also tidied up the fretboard a bit, ready for gluing into place, and made some lengths of binding (rosewood) and bent them to shape on my bending iron.
Sunday, January 09, 2011
The soundboard
I have made some tone bars from some nice quarter sawn Alaskan spruce (it's light as a feather) and glued the first three in place. I have put a very slight curve in the soundboard to help resist the downward pressure of the strings (although I think that this will be only modest with gut strings).
Finally, I have also started on the fretboard, by locating a lenght of rosewood in my 'woodpile'.
Monday, January 03, 2011
Thursday, December 30, 2010
Soundboard
I have planned the bracings and rosette and made a start on them - more in the next post.
Sunday, December 05, 2010
Neck Joint
I've also been thinking a bit more about upcoming projects...here is the current list:
Finish the Gittern
Finish the Cittern
Bowlback Mandolin
Parlour Guitar (for daughter)
Tenor banjo with wooden soundboard
Cherry Mandolin
Electric Micro mandolin
...but I sure that this will change !
Sunday, November 28, 2010
A bear head
Secondly, I have made some progress on the pegbox - I'm quite pleased with the bear, even if he does seem a bit stern.
And lastly, I have been bidding for (and have just won) a baby milk warmer on e-bay. "Why?"you ask. Well, I will be gluing the gittern together with hide glue, and I will use the warmer to keep the glue at the right temperature. It's a bit cheaper than buying a more traditional glue pot.
Saturday, October 30, 2010
Even more like a spoon
The bolwback arrived safely. I am going to make some technical drawings and then take it to bits so I can figure out how it was put together. I'll then make one of my own (and might be able to restore the old one too, who knows).
Sunday, October 17, 2010
A big spoon
Meanwhile, I have finally got around to buying (on ebay) an old bowlback mandolin. I will use this to start preparing plans to construct one of my own in the future.
Tuesday, October 12, 2010
A new start
Wednesday, August 11, 2010
Finished
Sunday, July 11, 2010
Nearly there...
Sunday, June 27, 2010
On with its neck
Tuesday, June 15, 2010
Nitrocellulose
I am now in the process of spraying the nitrocellulose finish to the body and neck. After sanding everything down about 6000 grit, I sealed both with a coat of shellac (Zinsser Bulls Eye). I have been spraying the back of the body with layers of a mid brown (a couple of coats each evening), and I'm now happy with the colour (the finish is from Manchester Guitar Tech). The neck has been coated with a lightly tinted gloss. I have also sprayed a couple of coats of clear gloss to the front prior to attempting the cherry sunburst. So far so good!
Also, I have started soldering the electronic bits together.
I really feel the clock ticking now as August approaches...
Also, I have started soldering the electronic bits together.
I really feel the clock ticking now as August approaches...
Sunday, May 23, 2010
Fretting
The task for this weekend was fitting and dressing the frets. With the binding on the neck, the frets needed to be undercut. I used a special tool from Steward Macdonald - it made job much easier. I'm beginning to feel the time pressure now.
Sunday, May 16, 2010
"I see you have constructed your own fretbender, young Skywalker"
Sunday, May 09, 2010
Starting to look the part
I haven't updated in a while, but I've been making steady progress when time is available. The new bandsaw has been a real boon - I think that this will be a great workhorse in the garage. The neck is now mainly complete - just the frets to fit and a truss rod cover to make. The most recent change has been the addition of the side dots. The body shaping involved a lot of planing, scraping and sanding and I think it looks quite nice. I've fitted the binding and I still HATE this plastic stuff. I know it's more authentic, and is easy to scrape flat, but the gluing is ever so fiddly and I always seem to be left with some gaps. These have been filled with epoxy, but I'm going to 'stick' with wood bindings in future!
The pictures show the neck in place, but there's no glue involved - I will apply the sunburst and finish (nitrocellulose from an aerosol can) to the neck and body seperately.
Friday, April 02, 2010
'ello John, got a new bandsaw
I've glued the two halves together, fixed them to the back, and routed out the cavities for the pickups.
Sunday, March 21, 2010
Neck
Well, the neck is now shaping up; the bindings are on (I remembered that I hate plastic bindings), and I have shaped the neck profile. I will put in the side dots next, but I'm going to leave fitting the frets until the neck is in place (unless I work out that this is a dumb order). My lad has checked the the neck profile fits his hand comfortably.There was a minor issue with the wood for the front, as it turned out that the piece I wanted wasn't in stock, but I am happy with the alternative, a nice bit of quilted maple.

Sunday, March 07, 2010
Fretboard
I used a home made sanding block with the correct radius hollowed out , and with a coarse grit paper it didn't take much effort to get a nice rounded profile. I finished off by smoothing it with my micromesh pads. Finally, I prepared the tenon where the neck will join the body. The next job is to glue the fretboard into place and complete the binding.
Thursday, March 04, 2010
Top
I have ordered the wood (from exotichardwoodsukltd.org.uk) for the top of the Les Paul. It appears to have a strong quilt figure which the customer, (older son), liked the look of, but I will have to see when it arrives. The outline drawn on it is not the proper shape, only a guide!Meanwhile, I am getting on with the inlays on the fretboard. My mini rotary tool died in the process (with a small bang), so I've replaced it with one from Axminster . So far I'm very pleased with it.
Sunday, February 07, 2010
Peghead
Sunday, January 10, 2010
Into the new year
Thursday, December 10, 2009
Further Indulgence
I have downloaded the Audible sound recording open source software, and I am beginning to get the hang of it. I've now mastered two track recording (well...overdubbing), so I thought I'd make a festive recording with my mandolin (it seems tiny compared with the octave) in duet with itself. All I now need to do is to master the playing a bit better. Anyway, here it is - Silent Night.
Tuesday, December 08, 2009
Indulgence
I fitted the carbon fibre reinforcing rods to the neck of the Les Paul, and made a start on the electronics. These are a bit confusing as I have got three diffrent wiring plans! Still, I've made my choice and done a bit of soldering. And now the indulgence...I thought I ought to have a soundfile of the octave mandola, so I've uploaded up a song - its written by Flogging Molly but mangled a bit here!
Subscribe to:
Posts (Atom)