Search This Blog

Thursday, December 27, 2012

A Halloween horror show

The lute body is now out of the mould and I have attached the neck blank (with a screw through the neck block and a coupe of alignment dowels). In the upper photo, lit from the outside, the view isn't great but it's not a complete disaster. I have fitted a rather 'rustic' patch where one of the ribs was too thin and some of the spacers are not as clean as they should be where my glue and ebony dust mixture has squeezed through some of the gaps.

However, real horror show can be seen in the lower photo. This was lit from behind and taken with the flash off. The horrible wavy grain is clearly visible, and the bright streaks show gaps in some of the joins between the ribs. I have reinforced these from the inside with some Araldite, and once the shape of the belly has been scribed I will add some paper strips to provide further support.

I was going to crack on with this immediately, but I learnt from my lute book that shape of the belly has to be taken while the body is still in the mould.  Once it's out of the mould, the body 'relaxes' and ends up longer and thinner!

Consequently, I have now started on the belly.

Monday, December 17, 2012

Irritated by spam

I have been overwhelmed with spam as comments from 'anonymous', and although they get filtered out by the system I still get dozens of irritating notifications. I have therefore removed the ability for anyone to submit anonymous comments. However, if you are a real human being (rather than a spambot selling shoes), I would love to hear you comments!

many thanks, Richard


Sunday, December 09, 2012

The lute is fighting back

I am finding the lute really frustrating - hats off to all the luthiers out there!! Working with the very thin yew wood is a pain and there seems to be no room for any inaccuracies. Unlike the bowlback mandolin, there is no tail block - instead the 'end cap' is added to the outside and a 'countercap' is put on the inside after the lute body is removed from the mould. This means that if there are any stresses,  a rib at the tail end will tend to 'peel away' from its next door neighbour.

This happened a lot!

I had fixed the middle rib to the mould  with a tiny screw, but I should probably have done this for the rest of them too.

Anyway, the photos show the making of the end cap, with its black veneer binding. After cleaning it up with a cabinet scraper I bent it into shape on the iron and glued it into place with Titebond.

This has strengthened the tail end considerably, but I have plenty of  cracks, holes and tiny knot holes to fix. I am going to work through these with Araldite epoxy glue mixed with ebony dust.

Meanwhile the mandocello bowl now has four ribs. I am finding these much easier to fit accurately - the walnut is a bit thicker, it has a very straight grain and the tailblock keep the ribs from peeling apart.

I much prefer the mandolin mould design, but the lesson from both instruments is that the mould should be as close to perfect as possible!

Sunday, November 25, 2012

Mandocello rib number two

Here is rib number two going onto the mandocello. I decided to find an alternative to the 'bungee cords' to hold the ribs in place during the gluing so I made these clamps. The threaded rod screws into a fitting set into the mould.  It seemed to work quite well.

Meanwhile, ribs ten and eleven were added to the lute. I am still finding it a struggle to get the ribs fitted neatly, and I think I will need to reinforce the bowl from the inside once it is removed from the mould.

Thursday, November 22, 2012

Mandocello ribs

The mould is now completed and waxed and I have fitted and shaped the neck and tail blocks. These were made from pine and are attached from the inside of the mould with screws. This allows the removal of the completed bowl, but it's also handy to allow the part completed bowl to be freed briefly from time to time to make sure that the ribs haven't become stuck to the mould!

The ribs themselves are made from walnut. I will need nineteen of them but I made 25 to allow for mistakes.These were sliced from a large block on a bandsaw (I didn't use a fence as I can get a better result by following a pencil line be eye).  The saw lines were 5mm apart, and after sawing the ribs were reduced in thickness on a drum sander to 2mm (the saw marks have just about gone at this thickness).

In the meantime, I am continuing to add ribs to the lute. Some go on nicely - other are a real struggle. I'm up to nine now, so only four to go!

Saturday, November 10, 2012

The mandocello mould takes shape

 Here is the mandocello  mould with all the infill pieces glued in place. These were cut out with a band-saw and thicknessed on a drum sander before gluing in place with Titebond.

In the second photo, the mould has been shaped and the recess for the tail block has been cut out. I have also removed a wedge shaped piece to accommodate the fold in the belly (just beyond the bridge). I did most of the shaping with an electric plane and finished off with an electric power file.  This made a huge quantity of wood chippings and dust!

I am going to mark the positions of all the ribs before giving the mould a wax coating.

Monday, October 29, 2012

Mandocello begins


I have finally started the mandocello. I have not tried anything on this scale up to now, and I'm also working more or less from my imagination! In the photo is the start of the mould/form. This is 12mm plywood, and I will be filling the 'spaces' with lime wood (lime is quite soft and easy to shape). This instrument will have a scale length of 680mm (a bit longer than the 'Gibson') which I hope will make the bottom 'C' string play better.

I am also planning to use carbon fiber as neck reinforcement, and also laminated into the belly bracing (a bit radical, this one - any comments welcome!).

Meanwhile, the fifth rib of the lute went on much more smoothly than the fourth one. I think it was a case of taking a bit more care!

Thursday, October 25, 2012

The fourth rib of shame

Here is the fourth rib fitted to the lute. I am finding working with the yew much more tricky than the walnut I used for the bowl-back mandolin.  The grain is REALLY wavy, and this means that I can't use a plane to trim the edges of the ribs to fit them together - there is too much tear-out. Files and sandpaper are the only things that work. I have also found that the black stained veneer that I am using for the spacers is difficult to bend accurately.

So why the shame? Well, I tried to fit the fourth rib with conventional Titebond wood glue, using tacks to squeeze the joint together and rubber straps to hold the ribs flat, as I had done before and...disaster! Gaps everywhere, nothing stayed in place properly and there was glue all over the place. So in the end I took it off, cleaned up the mess, improved the fitting and used Zap-a-Gap cyanoacrylic glue to stick on rib number four. I did this by working in short sections and started by gluing the black spacer on, followed by the rib.

It looks fine now, after a pass or two with a cabinet scraper, but I don't think that this is a good way to proceed. I guess in the end, that it comes down to the mould - this needs to be perfect in order to get the ribs to join properly.

Saturday, October 20, 2012

Pegs

I have had a first stab at turning pegs for the lute. It's only a practice run - the wood here is sycamore, rather than the pear wood that I will use in the end, and the peg is too large. But overall, not a bad first try!

When I come to the 'production run' I will probably make a jig for my lathe to follow a template in order to keep all thirteen the same size and shape.

Tuesday, September 18, 2012

The first two ribs

Here are the first couple of ribs (there will be thirteen in all) fitted to the lute form. The yew wood was taken to a thickness of 1.5mm on my drum sander before bending into the correct shape. The thin black dividers (I have always called them stringers - is that right?) are cut from maple veneer (0.6mm) stained black. These are bent to shape in a  hacksaw slot cut into the top of my bending iron.

The yew has a lovely grain, but it is really wavy and so it's very difficult to plane the side of the rib ready for fitting the next one. I have instead made much more use a small file for this step.

Monday, August 27, 2012

Lute form

I finished the bulk of the work on the 'form' for the lute today. It's made from sheets of pine stacked together (I'm saving my lime wood for the mandocello form).

As with the last one I made (the mandolin), I ended up attacking it with all sorts of different tools to try and get the right shape.  The included my block plane, an electric plane, a rasp, a spokeshave, a belt sander, a drum sander on an electric drill, chisels and gouges!

The electric plane and block plane were most effective for roughing it out, and the drum sander was great for  flattening it were the thirteen ribs will go.

On a completely different matter, we found a brown long-eared bat in the garden yesterday, so I took a video...:


Sunday, July 08, 2012

Lute ribs

I have finally started work on the lute. It will be based on a 1592 seven course alto lute by Venere and I will be guided by the plans in Robert Lunberg's book.

I am using yew wood for the bowl, and the first job was to cut up a block into 4mm slices. I will reduce these in thickness to about 1.6mm on my drum sander prior to bending them to fit the form.

Also on the drawing board is a bowl back mandocello - I will have to develop my own ideas for this one!

Sunday, June 10, 2012

Cittern completed

 The cittern is now fnished, and I am happy with the outcome. I have learnt a lot, and my techniques are improving

There were a few minor glitches in the final stages. I had to redo the nickle plating on the tailpiece as some of the nickel flaked off when I drilled the hole to accomodate the strap button. After a bit of research I worked out that the brass needed an acid wash before the plating (even though it had a mirror finish), so I scraped of all the plating, repolished it and then gave it a bath in 20% hydrochloric acid - it's amazing what you can buy at the local hardware shop. After this, the nickel plating went on well and there was no flaking.

When I was fitting the bridge I was a little over enthusiastic in reducing the height, and the action ended up too low - particularly on the thicker G and D strings. To fix this I added a thin layer of ebony to the bottom of each bridge foot, and as well as correcting the height of the action, I think it looks quite pretty!

The instrument is quite heavy (particularly after working on the bowlback). This is partly due to the wider neck (the shape of the neck suits a larger hand size), but the 10 Schaller tuning machines also make a significant contribution. I think that future work will be towards smaller, lighter instruments

I am now looking to sell this cittern (drop me a line if you are interested!) - I will load up a soundfile over the next week or so.


Sunday, May 27, 2012

Nickel Plating

In the end I decided to do the nickel plating myself. Although the quote to get it done professionally was slightly cheaper than buying the kit, I though it would be more fun to try it myself. It was fairly straightforward to do - all the chemicals were provided in the kit, and it was just a matter of adding the correct quantity of distilled water and firing up the battery charger.
 
The final product was nice and shiny and didn't even need much of a polish. The plating solution should keep indefinitely, so I.m sure that I will be doing this again to make custom tailpieces,

Saturday, May 12, 2012

Trying out a soundfile

I am having a go at including a sound sample. I signed up to soundcloud, and uploaded a short soundclip of the new bowlback. I wonder if this will work......!

Monday, May 07, 2012

Cittern tailpiece

The cittern has been progressing slowly in the background while I've been concentrating my energy on the more exciting bowlback mandolin. The cittern is nearly done, but still needs a tailpiece. I searched the internet for something suitable, and the only option seemed to be the Allen Guitars one. By the time I added postage and the dreaded customs charge, I was looking at well over one hundred pounds! I'm quite pleased with the citttern, but -  one hundred quid? No way. So, I decided to make my own from some 1.5mm sheet brass. I am now looking into plating it with nickel - if the quote from a commercial plater is too high, I will have a go with one of the kits that are available online (e.g. the one from Gateros).

Sunday, May 06, 2012

Finished...!

This weekend I have added the 'ironmongery', made and fitted a nut, and fitted the bridge. This is a first fitting, and there are still a couple of minor tweaks to fix. The first is a buzz on one fret (and only on the G strings) - the rest of the frets play cleanly, right up the fretboard. The other possible problem is the bridge. The shaping of the bone cap on the top makes the bridge tilt forward a fraction - it doesn't seem to buzz or affect the sound, but I might make a new one with a slightly wider base which will sit completely flat on the belly.

I'm very pleased with the sound. It is a bit quieter than a flatback mandolin, but with a more interesting tone, and good sustain. Even before I make any final adjustment to the bridge, the action has ended up fairly low.

Sunday, April 22, 2012

Woodwork finished

I shaped the neck to the final width and then added the remaining frets (I was glad that I fitted the higher ones before gluing on the fretboard). This left some levelling (I use my diamond coated sharpening plate) and dressing of the frets.

The last 'woodworking' jobs were a little bit of filling (super glue and wood dust mixed together) and covering the holes at the end of the fret slots (shellac coloured wood filler). Then a final scrape with the cabinet scraper before working carefully through the micromesh to give a smooth finish.

Finally I've started applying the tru-oil finish (except to the fretboard, masked off with insulating tape which will remain without any finish).

Sunday, April 15, 2012

Fretboard

I made the fretboard from some of the Macassar ebony. Cutting the fret slots was not easy as the saw kept binding in the slot - I wonder if this is a property of the wood. I had to complete the slots with a slim file. I installed the upper frets (including a dab of pva glue) and dressed them. Prior to fitting, I had filed off the little diamond-shaped nubs from the fretwire, but despite this fretboard started to bow alarmingly. However, I know from experience that it is difficult to fit the frets over the belly once the fretboard is place, and that all will be well once it is glued flat.

Finally, I glued the fretboard onto the neck (with hide glue, of course) and clamped it up.

Tuesday, April 10, 2012

Decorative Binding - part 2

Here is the finished binding. I cut the ledge with a router where I could and finished it off with a scalpel and chisel. The holly strip was glued in with hide glue (I'm getting to like it!) and I finished it off by scraping flat.

I have been giving some thought to the fretboard which I will be working on next. I have decided to make it 4mm thick and to go with a 336mm scale length, and 22 frets. The top six frets will be on a narrow part of the fretboard that extends over the sound hole.

Monday, April 09, 2012

Decorative Binding - part 1

 I decided to fit the binding in two parts. First I cut a shallow recess all around the top. Because of the geometry, I ended up having to make a little jig (in the top photo) with a scalpel blade mounted in it. This was used to make a fixed depth cut in the belly wood, and I then removed the waste wood by hand, with a chisel.

I chose the edging materials to match the rosette. It was made with strips of macassar ebony (about 1.5mm thick) sliced across the grain. I glued these in with HIDE GLUE.

I finally got round to making up a batch of hide glue with a decent consistency, and I have to say I found it quite easy to use.  The trick seemed to be to coat both surfaces to be glued and to work quickly. The only problem was if the bits of edging moved around while the glue was cooling. In that case they had to be removed, cleaned up and redone (this only happened on a couple of pieces and was not very time consuming).

The next day I scraped everything flush. The next step will be to cut another ledge to take a strip of holly which will add a nice contrast, protect the edge (holly is quite hard) and hide the belly end grain.

Sunday, March 25, 2012

The belly's on

The belly went on without any fuss, and I have now trimmed the overhang ready to start on the binding. I decided to use some of my new holly for this, so I have cut some thin strips on the bandsaw and used the drum sander to reduce then to 1.5mm thick (veneer, really).

Saturday, March 24, 2012

Exciting wood

I always love getting hold of new bits of wood. I have just picked up some new pieces from Paul at Goulden Hardwoods. I've been planning my next instrument, and top of the list is a lute. I am going to have a go with yew ribs, and sycamore neck. Also in the selection is some lime to make the mould (the sycamore I used in the mandolin mould was a bit hard). The holly will be for inlays (it has a really nice figure against the pale background) and the walnut at the front is for the ribs of the next bowlback mandolin. Finally, the really big bit of walnut in the back looks like it might offer up a guitar back and sides or two (so it will be sitting in my workshop for some time yet!).

Meanwhile, I have glued the belly onto the bowlback mandolin. In the end I used titebond, and used plastic insulating tape to hold the belly in place while the glue sets.

Sunday, March 04, 2012

Bowl and Belly

The belly is now pretty much completed. The two halves of the tail side of the belly were glued together and this forced the 'cant' angle to set and the belly to stiffen. I glued a reinforcing strip along the underside of the join - I think that this will also help with the accoustic properties of the belly by making it a bit stiffer without adding too much weight.

I used Extramite (formaldehyde urea) glue for this joint.

I tidied up the braces, and added the reinforcement piece at the neck end of the belly. I assume that this is to help support the fretboard, and I don't think that the belly here will add much to the sound.

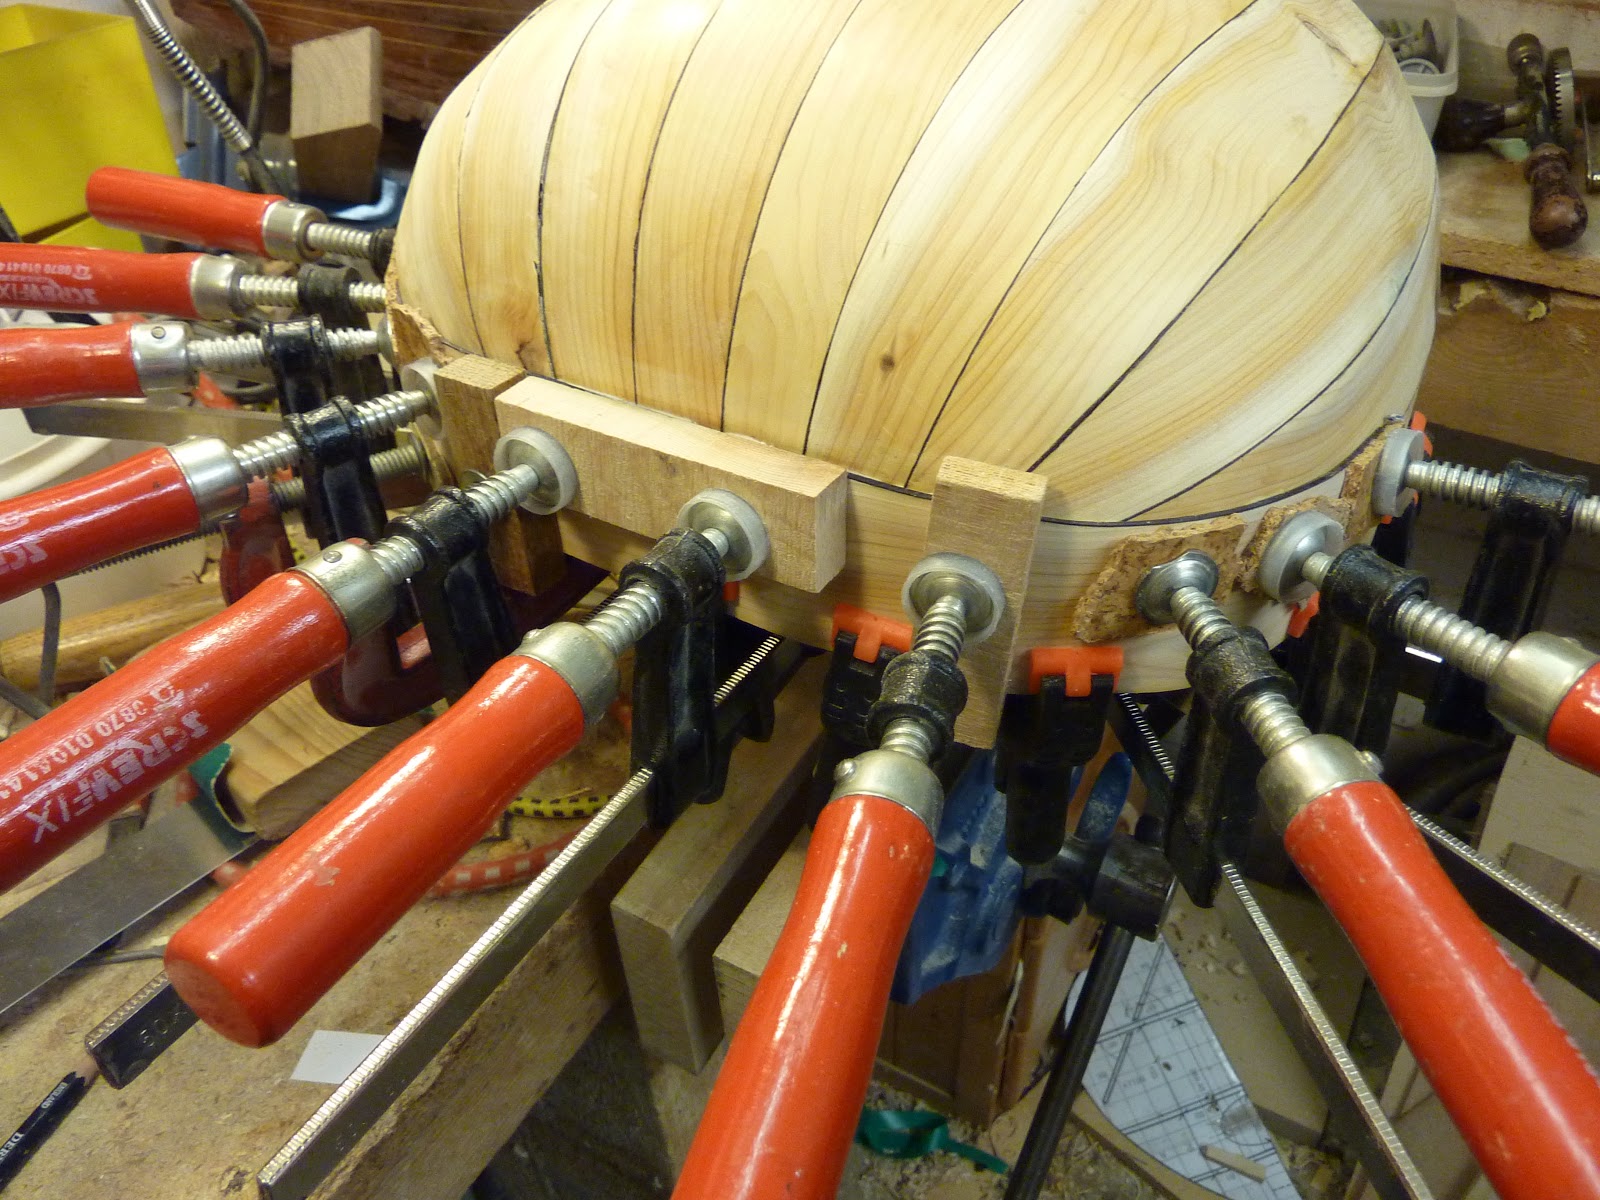
Before the braces were cut to length I marked the position of the notches cut into bowl (three on each side and one at the tail end to accommodate the reinforcing strip.

Two of the side notches are shown in the third photo.

The final job for the day was lining the bowl with paper. As I understand it, this will help reinforce the rib joints, and will also make the inside of the instrument look a bit neater!

I puzzled over the choice of paper and glue, and asked Dave Hynd for a bit of advice. Dave has a fantastic website: Mandolin Luthier, with lots of really useful information.

He was very helpful, and I ended up using brown parcel paper and PVA glue (diluted a little with water).

The moisture in the glue might cause the ribs to shift a bit, but a couple of passes with a fine cabinet scraper should fix this when everything is stuck together and dry. I will probably apply a coat of clear varnish over the paper after I have stuck the label in.

Sunday, February 26, 2012

Mistakes

I'm sure that everyone makes them, but here's my latest one. When I measured the tuning machines to find the correct spacing for the holes in the peghead I was 1mm too short. This was down to the metal plate being slightly bowed and I foolishly measured at the ends of the rollers and not at the base where they join the plate. I went ahead and drilled the first set of four holes before I realised my error and the final hole ended up 3mm out of position.

To fix the problem I glued a circular offcut of peghead veneer to the end of an 8mm wooden dowel and used superglue to fix it into the wrongly positioned hole. The pegheead veneer was left a little proud and scraped flat when the glue was set. The other end or the dowel was sawn flush with the rear (the endgrain will be hidden by the tuning machine plate).

Finally, I redrilled the holes (using a jig with the correct spacing), and the final result is not too bad. Most of the repair will be hidden by the tuning machine bushing, in any case. I made a better job of the second set on the left.


Sunday, February 19, 2012

The Belly

Here is the rosette and pickguard inlaid into the belly. I made them quite thick, so there was a lot of scraping to get them flush with the belly wood. Sandpaper wasn't suitable as the ebony dust would stain the spruce wood.

The next job was cutting out the soundhole, and after that the more tricky task of cutting a wedge shaped slot into the part of the belly that slopes downwards. In retrospect, I probably should have done this before the two halves of the belly were glued together, but in the end I used a scalpel and a razor blade, and I was reasonably happy with the outcome.

The next stage was bending the front. I first made a groove in the back of the belly that went about two thirds of the way through (leaving a bit less than 1mm of wood). After a bit of experimenting I found it was best to put some water onto the belly at the join, and then apply heat to the front while bending. Once I had the required 15 degree angle I clamped it onto a wedge while it cooled.

The lines on the last photo show the position for two of the three braces.


Sunday, February 05, 2012

Rosette

After thinking long and hard, I decided to make the rosette and the scratchplate out of macassar ebony to match the fretboard and peghead. I made an oval pattern on the computer, and sliced out bits to fit and glued them together with superglue. It was finished off with some black and white banding.

Sunday, January 15, 2012

Fretboard

First of all, Happy New Year to anyone reading this post.


Over the holidays I managed to make some progress with the cittern. I have been working on the radiused fretboard which is made from a nice, black, ebony. Before I cut the slots I made a new slotting jig, with roller bearings for the saw blade, depth stops and an indexing system for the fret spacing. This worked well initially, but the saw was sticking badly in each slot beofe the correct depth was achieved. I eventually switched to finishing the slots by hand, but even then I had to use candle wax on the saw blade (which I wasn't happy about).

In the photo, the fretboard is only clamped to the neck - it is located in place by some tiny dowels (made from toothpicks) which will stop it slipping about when I glue it in place.

The bowlback has been fitted with its last side pieces as well as a macassar ebony peghead veneer which will match its fretboard (and probably pickguard too). I'm now ready to start the belly - this presnts some difficult challenges on account of the 'fold' - watch this space...